Benefits of Loft Bed DIY
If you have a child who is always on the go, a loft bed is a great option. She will have tons of storage and organization space. This bed includes a separate shelf, bookshelves, and dresser. A loft bed is a perfect solution for the stylish girl with many clothes. The storage area can be used for folding clothes and hanging them. She can store everything in one place and still have space to play or read.
Free loft bed plan
If you’ve ever wanted to build a loft bed for your kids, you’ll want to check out a free plan. These plans feature a video overview and step-by-step instructions. You’ll also get a list of materials and tools needed for the project. Whether a woodworker or a beginner, this free plan can help you get the job done. And, it’ll free up some space in your home, too.
A free loft bed plan is a great way to save space, build a desk or a closet, and even have a fun play area. These plans can also include photos, diagrams, and comments from other users. You can build a loft bed for as little as a weekend using a free plan! There are photos and written instructions included with a materials list. And they can be downloaded for free.
To build a free loft bed, you can visit Black and Decker. This plan comes with a materials list, a cut list, and color photos. You can also visit Home Depot and download a DIY loft bed plan for more detail. The plan comes with step-by-step instructions and a materials list so that you can start immediately. You can also download a plan for a free loft bed plan from Home Depot.

- Woodworking Plans To Build Your Own Beds
- Easy to Follow Instructions
- Complete Optional Hardware Kit (Lumber not Included)
- Materials Shopping List Included
- Build a Solid Very Sturdy and Good Looking Bed
Last update on 2026-07-23 / Affiliate links / Images from Amazon Product Advertising API
Materials for a loft bed
There are several benefits of DIY loft beds. For example, you can save money by building your own. You don’t have to spend hundreds of dollars on a loft bed when you can build a quality one for under $500. In addition, you don’t need to be an expert woodworker to create this unique and functional piece. The process should take you just a couple of weeks, and you can save a lot of space. Plus, you’ll get to save money by integrating a desk or work table into the design.
The first step in building a loft bed is ensuring you have the right materials. You’ll need wood for the base and plywood for the frame. Depending on your preference, you can choose to use treated or untreated wood. Choose a durable type that won’t warp. Ensure you don’t use glue or nail guns to join the planks. Also, you’ll want to consider your bed’s location because it may need reinforcement to avoid dents or scratches.
After making the framework, you’ll need a pipe, usually mounted on the floor. If you’d prefer a more stable bed frame, you can install galvanized pipe on the floor using Flange fittings. You’ll need a pipe for the ladder, Kee Klamp fittings, and 90-degree elbow fittings. Lastly, you’ll need a pipe to build rails. You can also use galvanized pipe for a railing.
Modifications to a loft bed
If you want to use the space under a loft bed for additional storage, you can make a few modifications. For instance, you can add a desk or chair. Or, you can replace the ladder with steps. Alternatively, you can create an accommodating frame out of two long rails. There are many ways to customize a loft bed to fit your needs and home. There are numerous options, but the basic plan remains the same.
Start by measuring and cutting a 2″x8″ piece. It should be 55″ long. To cut it into seven pieces, use a miter saw with straight cuts at the points. Once you’ve cut the pieces, double-check your measurements and sand the ends of the timber with grade-A sandpaper. Once the pieces are sanded smooth, you can stain them. The second piece should be placed on top of the two-inch-long piece to support the slat sheet.
If you have roommates, you can consider getting a double-sized loft bed. It is perfect for couples or those with varying health issues. The only modification required is swapping two 2″x2″ pieces for two 2″x8″ pieces. You can also get a slanted loft bed for an entirely new aesthetic. This will allow you to showcase the bed and look more artistic in your room.
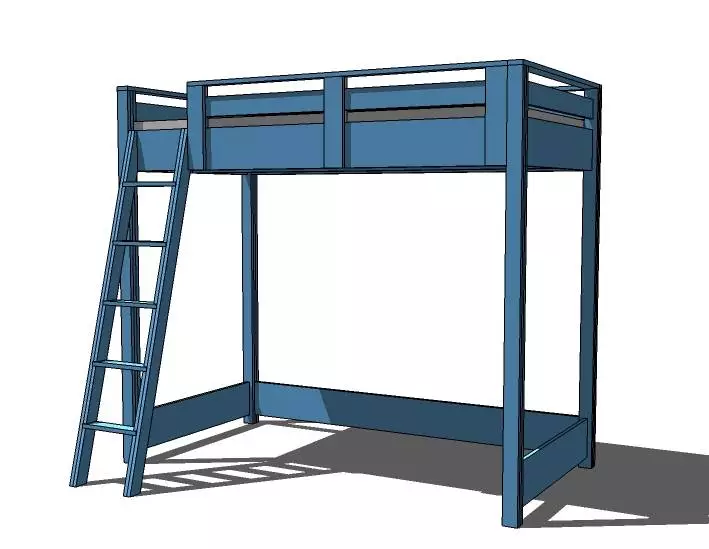
Building a loft bed
One of the advantages of building a loft bed is the space it creates. Your child will be able to use the entire area as a play space or a place to sleep due to its open design. Moreover, the structure provides a space for storage, so it’s an excellent option for kids who love to store their belongings. Loft beds are usually constructed with a staircase leading to a small play area. You can also install shelves and other kiddie accessories on the lower part of the bed. Lastly, the design of the loft bed can be altered to accommodate your child’s taste.
A pipe railing is another great option. You can use pipe or wood for the railing. You can also install a fireman’s pole to make the staircase a little more decorative. Its design is similar to that of a ladder, but instead of having the ladder on the floor, it rests on a horizontal pipe. Once the ladder is built, you can attach it to the frame with flange fittings.
To construct stairs, you will need to make use of 2x4s, a circular saw, and a set of woodworking tools. Ensure that the slats are smoothed out with sandpaper. Repeat the process for the other support slat. You will have a sturdy base for the loft bed and an easy way to access it. When you finish this step, the construction of your loft bed will be complete.
Building a loft bed with a slide
A loft bed with a slide can add great fun to your child’s room. A slide makes it easier to get out of bed. It can also increase their fun factor during the day and make getting out of bed much easier. There are two main reasons to build a loft bed with a slide. First, a slide allows your child to be creative during the day and has a double-edged purpose in night. Second, it can also provide a secure means to go to the bathroom.
When building a loft bed with a slide, it is best to start with a base frame. First, prepare the base frame by putting wood glue on the surface and then screw in the frame. Next, attach the 1 x 6 slat boards onto the top and bottom frames. Make sure that the slats are about three inches from the floor. Then, you can move on to assembling the legs of the bed.
If you have a metal frame bed, you can use 2×4 lumber to bolt on the bottom of the frame. Remember to follow the manufacturer’s instructions for attaching slides. If you do not want to use screws, you can also buy preformed plastic slides that are already built to meet safety regulations. After installing the slide, you can add a desk and a headboard slat on the side of the bed.
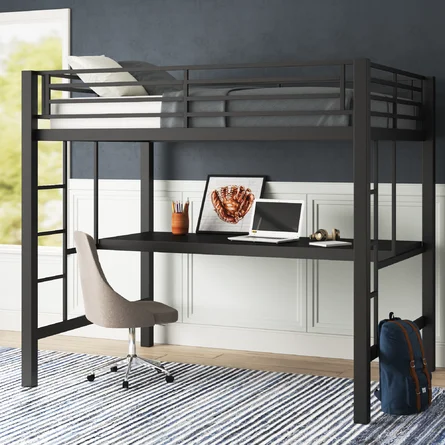
Adding a desk to a loft bed
Adding a desk to a loft bed is a great way to create more space for a child’s room, whether for their own bedroom or a shared one. This bed style features two symmetrical storage units and a desk built into the corner. It also looks great in a rustic farmhouse or industrial-style decor. Because the desk is attached to the panels holding the loft bed, it provides additional storage space while leaving a more open space underneath for accessories.
Once you have assembled the frame, attach the desk to the top and bottom shelves using two 3-inch screws. Make sure to countersink the screws just below the surface of the desktop and add wood filler or putty to the exposed wood. After you’ve completed the top, you can paint it or add a finish to it. Depending on your style, you can add a stationary or hinged desk. To build a desk, you need to cut a 2x4x10 board that measures 54 inches high and 32 inches wide. Attach two 3-inch screws on each end of the board.
Brad and Armand built this lofted space for their grandchildren and used galvanized pipe and 90 Degree elbow fittings to create a safe space. A full-size mattress and tent-style bed also fit comfortably in the lofted space. The finished product is beautiful and functional! The kids will love it! You’ll find it easy to put up a desk with minimal effort. The possibilities are endless with this DIY project.